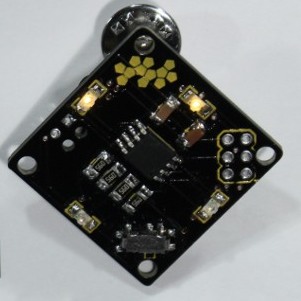
Surface Mount Badge Build Instructions
Ready to learn how to solder surface mount components? Let's roll!
Build the Surface Mount Badge
Got your tools (including tweezers)? Great! Let's earn the Surface Mount badge! This should go pretty quickly, but, take your time, and make sure to test each step as you go along. (If you're more of a video person, there is a video walkthrough over in the sidebar.)

Install Resistors
Install the resistors. If you're working with solder, it's usually easiest to tin the pad, then hold the resistor down with tweezers, melting the solder to get a join. Once that's done, solder down the other pad.

Install Capacitors
Next, install the capacitors. It doesn't really matter which goes where: they're connected in parallel, so either pad is as good as the other.

Install LEDs
Install the LEDs around the edge of the board. Note the little diode symbols on the board; this is the direction you need to point the LEDs. To find the orientation for your LEDs, look at the bottom. There will be a handy triangle there. They also often have a dot or line on the cathod on the top.

Install Switch
The switch is a little awkward sometimes. It has little plastic nubs which go into the holes through the board under it. This is helpful, as it tends to seat itself. Tin the four pads around it, then sit it on them, and tack it down. You'll probably want to touch those up, then solder down the three connecting pads.

Install ATTiny
The last step on the top is the ATTiny85 IC. Tin a corner pad, then hold the chip down and very quickly tack the corner down. After that, gently melt the solder and line the chip up well (try to do this quickly). Once you're on the pads all the way around, hold it in place for a second to let the solder get nice and cool, then solder down the remaining pads.

Install Battery Holder
Flip the board over, and find the battery holder pads. Tin them, and, very carefully, tin the flaps of the battery holder. Be careful not to burn yourself holding down the battery holder. Once they're both tinned, line up the holder, and put your iron on top of the tab to melt both puddles of solder and get a solid connection. Again, tack one side, then melt it to rework and get lined up as needed. Then do the other tab. Make sure it's not shorting out on the ICSP header at the back of the board.
Things to check:
- Is the battery holder shorting out on the ICSP header pins?
- Is the ATTiny on the correct way? The dot should be facing the resistors.
- Are any of your components tombstoned? (only soldered down on one side)

Install Battery
Install the battery and turn it on. You should get a nice soothing pattern of LEDs.

Solder on the pin
Finally, solder down the pin. Remove the battery (tweezers are helpful to push it out of the cage). On the battery tab under the logo, add a glob of solder. Then, put the pin in your third hand tool, and put a bit of solder on it. The trick there is to put a glob of solder on the end of your iron, then hold that up against the head of the pin for a few seconds. It should flow off and attach itself to the pin, like in Terminator. Let that cool. Let it cool some more. It's really, really hot. Once it's cool enough to handle a bit, grab the pin with some pliers, and position it over the tab. Melt the solder on the pin a bit, then the tab, and then go back to the pin. Once they're both melted, set the pin into place, and hold the iron on the back of the pin's head. It should melt down, and situate itself.

Done!
Let that cool (see above about really, really hot), put the battery back in, and pin the badge on your nerd sash.
