Breaduino Tools Required
It shouldn't take more than an hour to get your Breaduino working, even with a few mishaps. To speed things up, begin by gathering up the required supplies and tools. Once you've done that, you'll soon have built your very own Arduino clone!
Things you'll need
Before you get to build your Breaduino breadboard Arduino clone, you'll want to check that you have all the tools and supplies needed.

The bits
The kit, naturally. Please check that you've got all the bits! We don't usually forget anything, but we're human, so something might have gotten left behind. The Breaduino parts list contains everything you should've received; if something did get left behind, let me know, so I can help you reunite your missing component with its kit family!
If you're new to electronics, you may want to print out the parts list and keep it handy during the build. The parts are listed in order of introduction, so it's easy to identify the next part if you're not sure what it is.
Needed supplies
This kit assumes you have a few basic tools (which aren't included in the kit). If you don't have any of these available, consider finding your local hackerspace. It will be full of people who know electronics, and typically they'll let you come in and use their equipment for a while. In fact, most of them would be thrilled to have you come out and get help. To find your local hackerspace, consult hackerspaces.org's list of hackerspaces.

Multimeter
A multimeter is something you really should own. If you don't have one, consider asking a friend if you can work at their house, or find a local hackerspace.
That said, this kit can be built without using one, assuming everything goes according to plan. I highly recommend owning a meter, though. It will make troubleshooting things a lot easier.
(If enough people are interested in these, I can stock a $20 starter multimeter. Drop me a line if you'd like to buy one.)
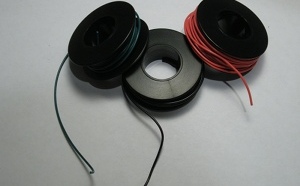
Hookup wire
Hookup wire! I buy mine from the Radio Shack a few blocks from my house. If you can't find "proper" hookup wire at your local Radio Shack, there are other options. In the past, I've used 20 gage solid-core "bell wire" from my local Home Supercenter (Menard's, in this case). It stays put, though it does stretch out the breadboard's metal clips a bit.
There are also nice commercial kits of pre-cut wire, which makes breadboarding go a lot faster. (I prefer to cut my own, for both cost and flexibility reasons)
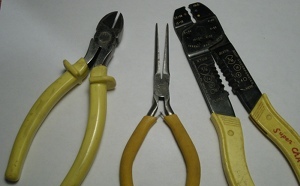
Dicutters, needlenose, and strippers
Tools for working with hookup wire: wire cutters, wire stripper, and a pair of needlenose pliers. If you cut your own wires, you'll find yourself reaching for these over and over again. Mine actually live in their own little plastic bin for easy access, separate from the rest of my tools.
If you use pre-made wires, you may still want needlenose to help push wire into difficult breadboard points (holes).

A random wallwart
A power source, providing between 7V and 12V DC. You probably have one of these around the house, left over from a broken CD player or cordless phone. I use this scavenged Sony adapter with the plug cut off and the wires stripped a bit. You could also use a 9V battery with a clip, too. The clips can be bought at Radio Shack (or found in a broken RC car).

Know where your ground is
A quick sanity check on the polarity of your power source. Make sure you know which side is ground and which is positive. Double-check this with your multimeter before proceeding! Hooking a voltage regulator (the 7805) backwards lets the magic smoke out, and it's really, really hard to put it back in.

If you'd like to reprogram your Boarduino, you have a few options. If you have an Arduino Duemilanove or BoArduino already, you can swap the chips between the breadboard and that device. If you don't have that, you'll need to get a serial cable. The FTDI Breakout from Sparkfun is a great product (you'll need a USB cable for it, too, though). Another good option is the FTDI Cable from Adafruit. They're about the same price ($20), and are pretty well equivalent.
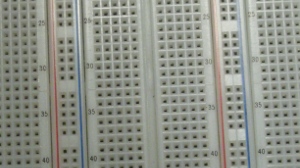
A breadboard!
And last, but not least, a breadboard. These are great things to own when you're learning electronics. They're also great to own when you're designing electronics. I use mine all the time; if I didn't own a good breadboard, I probably wouldn't bother doing electronics as a hobby. They make things faster and cheaper than any other construction technique I've seen, and are incredibly flexible.
Get to building
Why are you still on this page? Get back to building your Breaduino!
